
When you are writing PowerShell scripts to automate various tasks in your everyday life in IT, the hardest part is often how to store the credentials to be used in your code in a secure way.
In this blog post I want to show you how you can use an Azure Key Vault to store the credentials and then fetch them in your PowerShell script to be used to authenticate to a service, so you don’t have to hardcode them in your code (giga no-no) or using a key file (also no). An Azure Key Vault can contain all types of secrets (passwords) or keys or even certificates, this make it an ideal solution to “keep your secrets safe”. I want to share two ways to access an Azure key vault, one way is to use a managed identity based on an Azure Virtual Machine (VM), witch in my opinion is the most secure way to do it, and other way is to use a Service Principal. An Azure key vault can contain all types of secrets (passwords) or keys or even certificates, this make it an ideal solution to “keep your secrets safe”.
The reason for using a VM in Azure, is that it can be used as a managed identity (a user so to speak) to then access an Azure Key Vault, and by then fetching the credentials you need without having to provide a username or password to access the credentials you need to use in your PowerShell code. The trick is then to secure the VM from unauthorized access, and you can even setup the key vault to only accept connection from the VM’s public address only, and you can add JIT (Just-in-time) access to VM to protect it as well.
By using an Azure Key Vault to store secrets or other credentials you are improving the security around your code, but you also have an easier way to replace credentials in case you are leveraging a Service Principal (Azure application reg) with a secret or a certificate in multiple PowerShell scripts. It can also make your life easier when you need to replace/renew those credentials when they are expired – You then don’t have to update your credentials in multiple scripts hence they are fetched from the Key vault.
The first method – Using a managed identity on an Azure VM.
You need to have the following resources setup in Azure to use a VM as a managed identity to access a Azure Key Vault with PowerShell:
- An Azure virtual machine (VM) with a Windows OS
- An Azure Key Vault
- Permission to create secrets in the key vault.
- PowerShell module Az
Once you have deployed those two resources in Azure, we are ready to make modifications to the VM to enable the System assigned managed identity this done by navigating to the VM in Azure, and then in the left side menu selecting Identity and then select On and then Save.

Once you select save you will be presented with this pop-up:
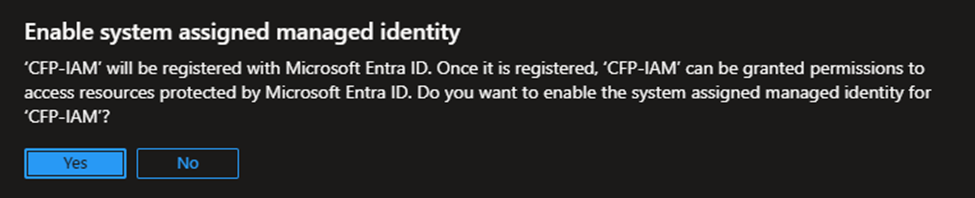
Select Yes
The identity for the VM will now be enabled and shouldn’t take more than a few seconds to complete. The window will then change where you will see an Object (principal) ID and just below that, there is a button named Azure role assignments. Select that button.
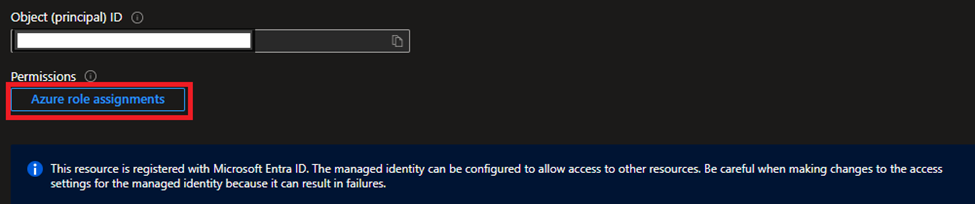
In the fly-out-menu from the right you will then select Key vault, the subscription where the key vault is and the key vault itself, and the last and most important thing is the permissions. By following least privileged access you should assign the Key Vault Secrets User role to the VM.
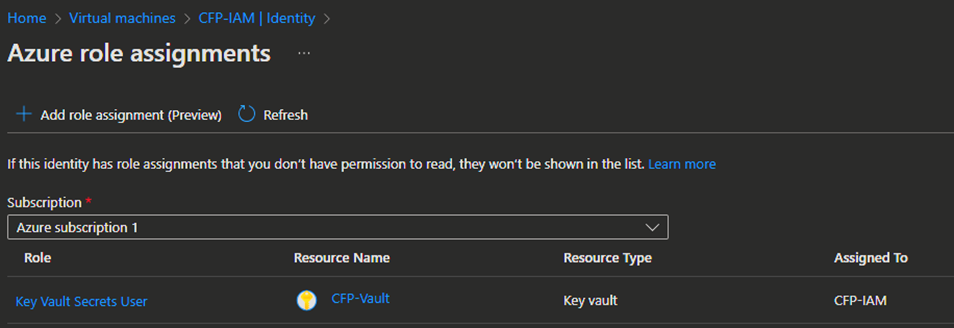
Now we have enabled the system managed identity to our VM, and we provided access to key vault that will be holding our (dirty?) secrets.
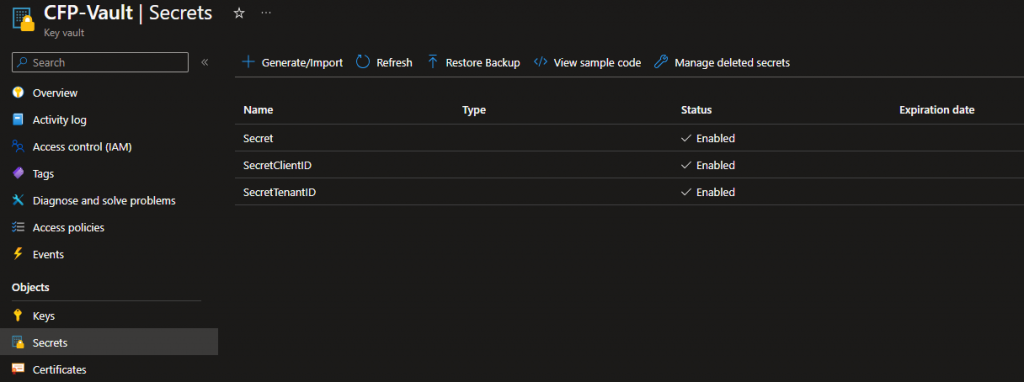
Adding a secret to the Key vault
Navigate to your key vault, and then select Secrets in the left side menu. Then select Generate/import in the top of page.

In the next window, we have the option to add our secret. Even though the “secret” or password.
In this sample I’m using a secret from an Azure Application reg., but it could also be the password of a service account, or the name of the service account, or your applicationID – Pretty much anything “secret” you don’t want to hardcode – But name of the secret will be used in PowerShell.

When you have typed in a name and the secret, then select create in the button.
Putting it all together.
Now that we have setup the VM’s identity and provided it with the necessary permissions to access our newly created secret, we can then proceed to test it out in PowerShell.
This code will connect to your default Azure subscription (If you have multiple subscriptions, you can run Get-AzSubscriptions and the copy the ID of the subscription and then replace the Connect-AzAccount line with Connect-AzAccount -Identity -Subscription “YOUR-SUBSCRIPTION ID”
You should now have fetched the secret from the key vault without hardcoding any credentials.
To put in context of connecting to the Microsoft Graph with the above code and then getting all users from the Microsoft Graph using a Service Principal (With User.Read.All (Application) permissions). I have then added ClientID, TenantID and secret into the key Azure vaults secrets tab.
The code will be like this:
If you are using the Microsoft Graph PowerShell module it will be like this:
Now you can run PowerShell script on this VM without hardcoding credentials, the scripts can then be run in the task scheduler if you like or on-demand.
The other method – Using a Service Principal
If you are not able to or don’t want to use an Azure VM to run your PowerShell code on and there by using a managed identity. Another way to access the secrets in the Azure Key Vault is to use a Service Principal with the same permissions as the managed identity – Key Vault Secrets User – But then use a certificate and ClientID to authenticate to the Azure Key Vault. The certificate will has to be installed on the computer you are running the code on – You can read this blog post on how to create a certificate and the use it with a Service Principal – https://www.christianfrohn.dk/2022/04/23/connect-to-microsoft-graph-with-powershell-using-a-certificate-and-an-azure-service-principal/ This blog post describes 3/4 of what we needs to be done. Once you have created a Service principal and created a certificate and uploaded the certificate to said Service principal, you can then fetch secrets with that Service Principal in PowerShell like this:
This is a simpler way of fetching credentials in an Azure Key Vault, but it can be a insecure way of doing it – This will depend on your setup.
Bonus section
I mentioned you can run the scripts in task scheduler, but I wanted to share some bonus information since task scheduler is (in my opinion) an old/legacy way of running automation tasks. My personal favorite way of doing this is by using an Azure Automation Account, this resource enables you to run PowerShell script without having a VM and it’s a cheaper way (for me at least) to run automation jobs. To do this, you firstly need to create an Azure Automation account. https://learn.microsoft.com/en-us/azure/automation/quickstarts/create-azure-automation-account-portal
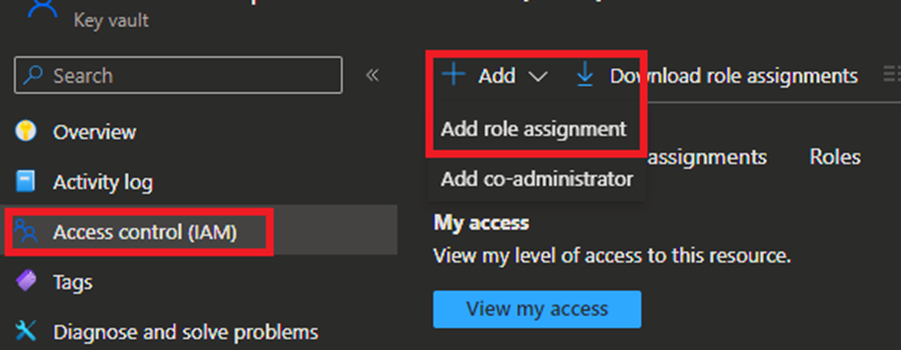
When the Azure Automation account is created you then need to assign the same permission set – Key Vault Secrets User – to the Automation Account like the VM. This is done by accessing the key vault and then selecting Access control (IAM) in the left side menu and then Add role assignment. Now select Managed identity and then press Select members. In the fly-out menu from the right, you need to select All system-assigned managed identities, here you should see your Automation Account. Select that and then select save in the button om the menu. Now select review + assign twice. The permissions have now been assigned.

You are now able to create a PowerShell runbook on your Automation Account and fetch credentials from your Azure Key Vault. You can use the same PowerShell code from above in the runbook.
Happy automatization!
You can read more about Azure Key Vaults here: https://learn.microsoft.com/en-us/azure/key-vault/general/basic-concepts