
Service Principals in your Microsoft cloud environment has long been a nice and convenient way to provide access to resources like SharePoint Online, Entra ID, Microsoft Graph or Azure resources by using a secret (password) or a certificate, and by then combining it with the client ID (username) for the Service Principles to be able to access said resources. But in a very simple way this I just a username (ClientID) and password (Secret) you are using to log in with, and that is not very secure in its own rights. But securing them has often been overlooked. Service Principle dont have the opportunitet to use MFA. So how does one improve the security around Service Principles?
One way to improve the security around Service Principals is to use Conditional Access for workload identities.
Microsoft released Conditional Access to Service Principals back in September 2023 (Conditional Access for workload identities), so this not something brand new out of the oven, but I thought I would share my experience with it and how I chose to secure my Service Principals using Conditional Access and to inspirer you to secure your Service Principles in your environment.
Pre-requisites
Before you can set up Conditional Access for workload Service Principals you need to purchase a new stand-alone license called Microsoft Entra Workload ID Premium, off the shell the cost is 3$ pr. identity pr. month and, it can be purchased the same way as you do with all your other Microsoft licenses.
The follow up question to that is – How many should I buy? – Microsoft gives an answer to that question here: https://learn.microsoft.com/en-us/entra/workload-id/workload-identities-faqs#how-many-licenses-do-i-need-to-purchase-do-i-need-to-license-all-workload-identities-including-microsoft-applications-and-managed-identities plus a lot of other answers on other questions related this.
Note: You will not be able to setup Conditional Access polices for Service Principals if you don’t have at least one license – The feature will not show up when creating polices.
Setting up the Conditional Access polies
Conditional Access for workload identities are policies that are only used by Service Principals and can therefore not affect users or groups. You will be given a choice when you set up a new policy to select either Users and groups or Workload identities.

Start by selecting Workload identities.
The next step is to select all owned Service Principals or Select service principals.
Since this the first time we are setting this up and don’t want to break production for all the other Service Principals I will select: Select service principals and then when presented with chose to choose either filter or select, I will choose: Select, and then select my newly created app. registration.

The next is to select what target resources we want the policy to apply to, and you are only left with to options: none or allcloud apps.
So, I will select All cloud apps.

Now we are getting to the part where we need to set up the conditions for the access our Service Principals.
My aim is to block the Service Principals from sign-in anywhere expect for Trusted Named locations. To achieve that, we need to create a Name location first. This is done by navigating to the Conditional Access overall menu, and then selecting named location and finally +IP ranges location in the top menu of window
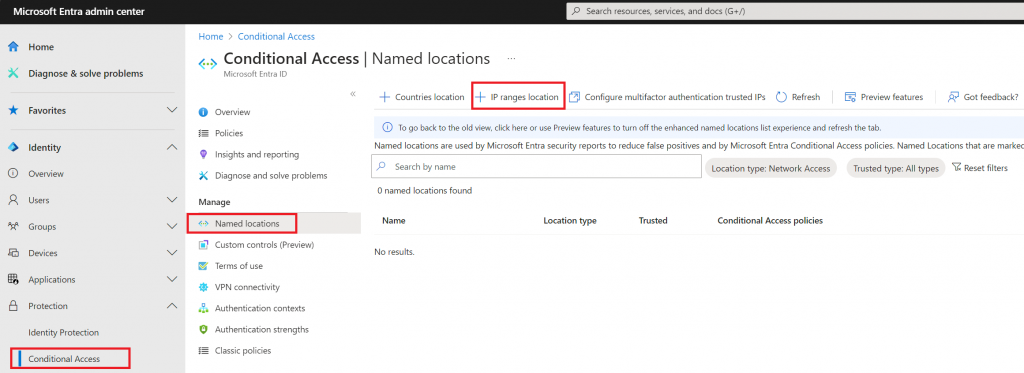
You will then see a menu fly out from the right side where you can provide a name for your trusted location and then the IP address range – You can add /32 at the end of the IP address so that it’s only that IP address that is trusted in that Name location.

When you have created your name location, we can then continue with the policy creation where we left off. As mentioned, the goal is to block any sign-in attempt unless it originates from a trusted location (that we just created).
The way I’m going to archive this is by selecting locations in conditions and then select Any locations, and then under Exclude selecting: Selected locations and then selected the named location(s) we just created.
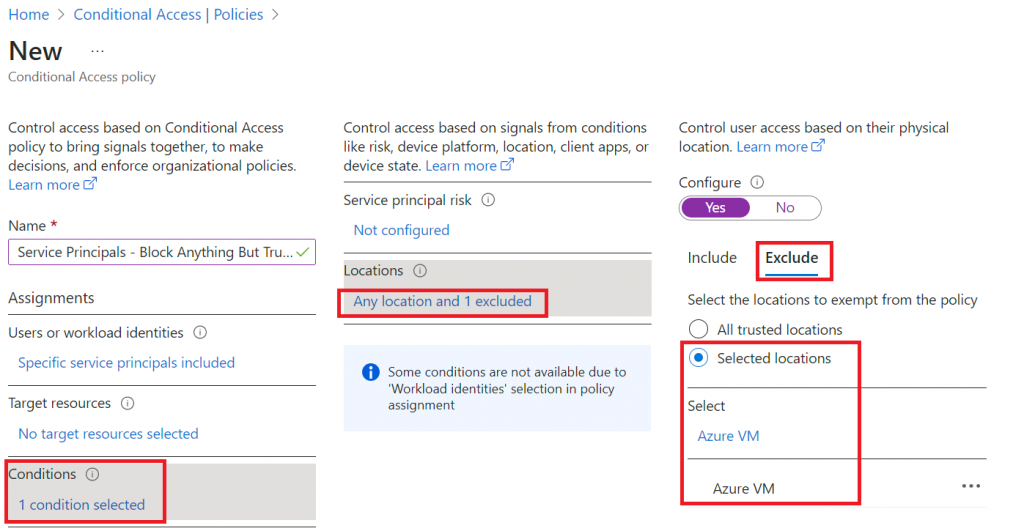
The last step in the Policy is under access controls – Here we will select Block access. The reason for this is because the condition is set to any location but excluding the trusted location.

You can now select on in the bottom on screen and then click create. The policy is now live for that selected Service Principal.

Testing the policy
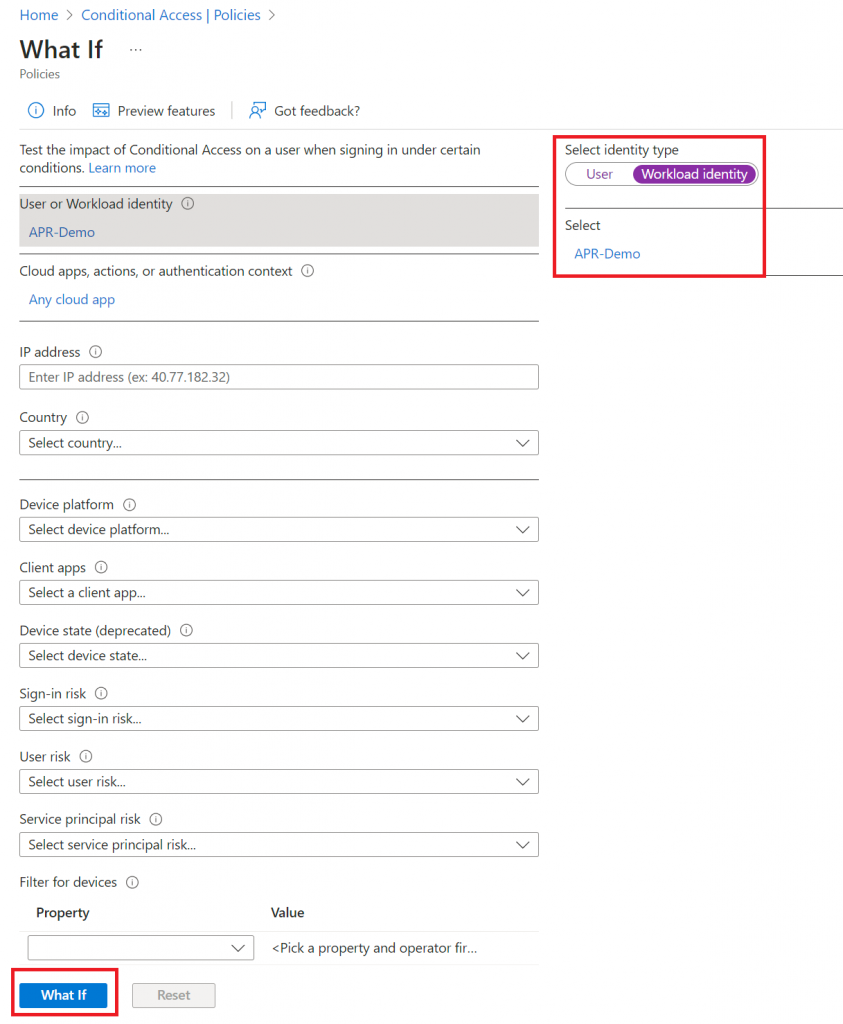
Now I want to test to see if the policy is working. This can be done in multiple ways. You can use the build in What if function in Conditional Access or I can try access the Microsoft Graph for example using PowerShell from a VM that as public IP address that isn’t trusted.
WhatIf:

The PowerShell way:

As you can see the access is blocked by Conditional Access, but after adding the IP address to the trusted named location. The code now runs as expected.

Wrapping up and finale thoughts
The policy to block selected Service Principals from sign-in unless it’s a trusted location is a great step a long they way to secure Service Principals since now they can only sign-in from trusted locations. Another policy that I created was to block access if any Service Principal was flagged as low, medium or high risk when signing in.
But, how can we “scale” this to fit all the other Service Principals that aren’t being targeted by this policy?
The good way for this is to create a named locations pr. Service Principal that contains the IP adresses from where the Service Principal is signing in from (and you trust!), and then add them into one by one into the Conditional Access policy along with the Service Principal.
You could instead just create one trusted named location and then add all the IP adresses into that one. This can however be tricky to maintain over time because there is no way to tag or name the IP adresses once they are added to the named location.
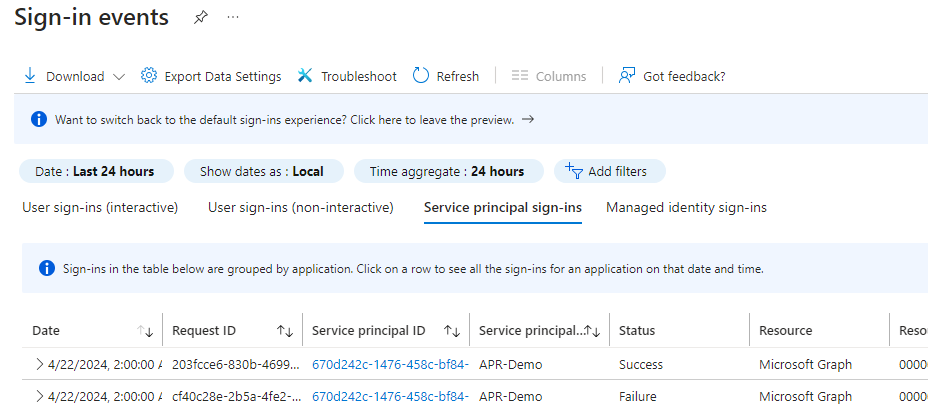
You can find the IP address that your Service Principals are signing in from by using the sign-in logs from Entra ID:
https://entra.microsoft.com/#view/Microsoft_AAD_IAM/SignInEventsV3Blade/timeRangeType/last24hours/showApplicationSignIns~/true and then select Service Principal sign-ins. and then start filtering pr. app.
Another way to do this is by using Azure Sentinel (if you have that setup) and running this KQL query:
This KQL query will list all Service Principal and list them by number of sign-ins pr. IP address and show the country (location) of the sign-in:
This KQL query is more simple one that list all Service Principal and what IP adresses that they sign-in from:
You can then use this to create named locations faster and with a better insight to support your newly created Conditional Access policy.