
Microsoft Graph is the new black. It may not be new for you, but nevertheless it’s important to know that Microsoft is putting a lot of effort into to the Microsoft Graph PowerShell module, and by doing so, The Azure AD PowerShell module and the PowerShell module Microsoft Online (MSOL) is soon to be retried by Microsoft and to be completely replaced with Microsoft Graph instead. You can read more about that here: https://azure.microsoft.com/en-us/updates/update-your-apps-to-use-microsoft-graph-before-30-june-2022/
Like any other PowerShell Module from Microsoft, you need to authenticate to the service using some form of credential type (username/password + MFA fx.), and the Microsoft Graph is no exception (surprise!) In this post we won’t be focused on the username/password authentication, but instead we will be using a certificate. The reason for this, is the purpose of using an authentication method to be used in automation scripts that can be run unattended in scheduled task or an Azure Automation account in a secure way. (We don’t want to have username/password in plain text in the code and the MFA prompt might be an issue).
But to use a certificate as our authentication method we need to have an Azure service principal.
It’s the service principal that will ‘perform’ our actions in PowerShell using the Microsoft Graph. This blog will cover how to create both the certificate and the service principal and demonstrate how to connect to Microsoft Graph.
Getting started – Installing Microsoft Graph PowerShell Module
First off, if you haven’t installed the Microsoft Graph PowerShell Module – you need to do that now.
Start PowerShell as admin on your computer and run the following command:
Creating the Azure AD service principal
Next, we need to create a service principal in Azure AD, but before you can do that, you need to at least Application administrator role in Azure AD RBAC to be able to create it.

Now that you have the role of Application administrator you can proceed to create the service principal. Go to https://portal.azure.com and select Azure Active Directory and then App registrations and press New registration.

All you need to do next, is to give your service principal a name (it can be changed later if you like) when you have come up with a name, select Register

Make a note of the Application ID and the Tenant ID – We need that when we are connecting to the Microsoft Graph later.

Now we need to assign API permissions to the newly created service principal – This step is like you are creating a service account in your on-prem AD and then assigning it read permissions in AD (fx).
For the purposes of this post we will assign permissions to read users in Azure AD – User.Read.All
To assign API permissions, select API permissions in menu to the left and then select Add a permission. In the fly-out menu select Microsoft Graph and then Application permission. Now search for User.Read.All and select it and finally select Add permissions. After the permission has been added, you need to consent to the permission(s). (There needs to be a green check mark next to the permissions when you are done)


Creating the certificate
We will be needing PowerShell for this step, so start by opening PowerShell (as admin)
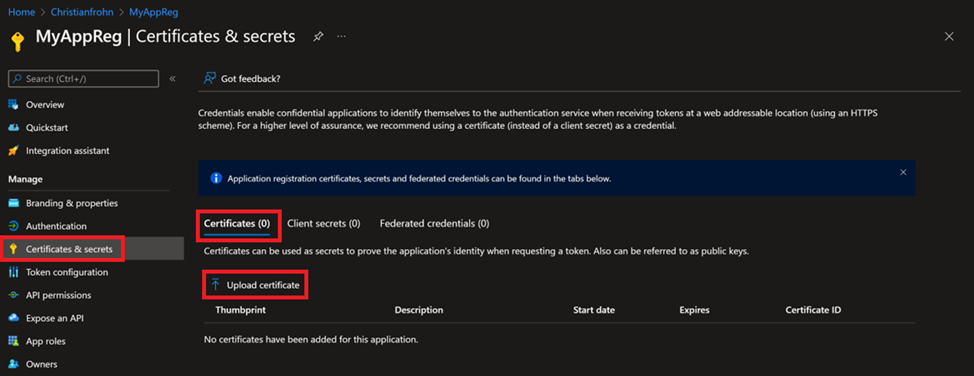
Now that we have the certificate, we need to upload to our service principal. Start by selecting Certificates & secrets and then select Certificates and then Upload certificate.
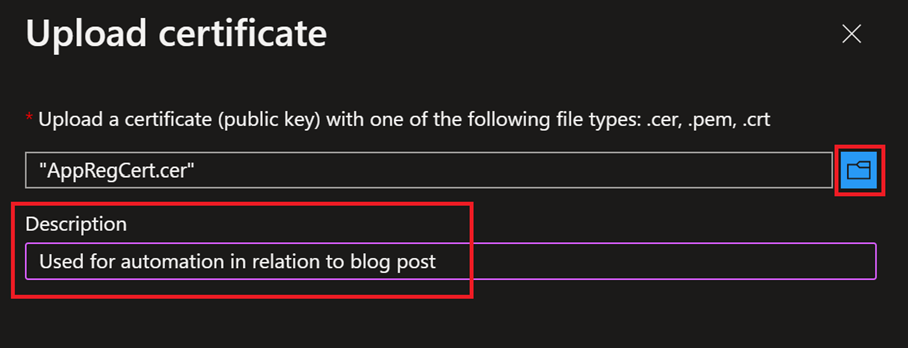
In the dialog box we need to upload the certificate and give it a friendly name. Browse to the certificate, select it, and then select add.
After the certificate has been uploaded to our service principal, make a note of the value under Thumbprint. We need that when we connect to Microsoft Graph using PowerShell
Putting it all together and connecting to Microsoft Graph via PowerShell.
Now that we have created our service principal, assigned it permissions and created our certificate we are finally ready to put it all together.
Open PowerShell and run the following command – You need to past in the Application ID and the Tenant ID you saved earlier and lastly the Thumbprint value:
You should have an output like this:

If your output looks like the above, you have successfully connected to the Microsoft Graph.
You can test it by running this command: Get-MgUser -UserId mail@domain.dk | Format-List